Tuesday, December 17, 2013

Geocaching Stats for December 2013

It's been a busy couple of months and I am just now getting around to updating my caching stats properly. I had lots of fun adventures but have slowed down my caching recently since buying a house.

Here's a run down of the highlights:

September

PyroYo007 and strontium87 at the Lone Star Roundup
  • On the way to and from the roundup event, I cached in eight new Texas Counties (88/254)
    1. Falls
    2. Limestone
    3. Freestone
    4. Henderson
    5. Smith
    6. Van Zandt
    7. Kafuman
    8. Navarro
Cached in eight new Texas Counties
Super Cache Member logo
  • Closed out my second month in the 365 day challenge by caching every day in September

October

  • Cached in a new state and got a new souvenir: Colorado
First Colorado cache with my nephew
  • Filled my 2000-07 Jasmer spot by finding Tarryall (GC18) with my mom
Finding Tarryall in Colorado

November

Geocaching in Space souvenir - November 2013
  • Revived a cache out near my parents' house that had been archived: Xerophilous
I think I'll probably continue blogging every quarter instead of every month about my caching stats. As always, you can find my caching stats on my website: strontium87.com. Until next time!


Tuesday, November 12, 2013

Feral Cat House

I stumbled across the idea of feral cat houses by accident on Amazon of all places. I then saw some examples of houses people constructed on their own. Since we're getting our first freeze tonight, I decided to make a prototype.

Time: 30 minutes
Cost: $13 per house

Materials
  • 30 qt. foam cooler
  • 18 gal. storage container
  • straw
  • box cutter
  • marker
I used the basic idea of the "Roughneck Homes" on Rubbermaid's website. It's a good, simple idea. The one change I made was to invert the foam cooler lid so that I could add more straw insulation on the top and so the storage container lid fit better. I bought enough materials to make two more, plus I have an entire bale of straw if I want to make even more.

I put this first one out front of my house to see if I get any occupants. I'll put additional ones in the back yard.

feral cat house made from a storage container and straw
Prototype feral cat house 

Tuesday, September 10, 2013

Create a Geocaching Search Engine in Chrome

The Chrome browser from Google is simple and power. It provides the option to set up your own customer search engines for sites you use a lot. Well I use geocaching.com a lot to look at cache page by their unique IDs or GC codes. This post will show you how to set up a custom GC code search engine in Chrome but the steps can be applied to any site with search.

Step 0
You need Chrome, so if you don't already have it, download the Google Chrome Web browser for free.

Step 1
Click on the Tools menu icon in the upper right corner of your screen to display the Tools menu. From the menu, click on "Settings." This will take you to the "Settings" page.

The Tools menu in Chrome
Step 2
On the "Settings" page, scroll down to the Search section and click the "Manage search engines" button. This will open a popup window.

Settings page in Chrome

Step 3
In the "Other search engines" section of the popup window page, look for the three fields for adding a new search engine:

  • In the first field, enter a name for the search engine. I chose "Geocache Finder."
  • In the second field, enter a shorthand code for using the search engine. I chose gc.
  • In the third field, enter the search link for geocaching.com. Copy and paste this: http://coord.info/%s
  • Click "Done" to save your new search engine.
Create a new search engine

Step 4
To use the Geocache Finder search engine at any time, enter the shorthand code, such as gc, into the address bar at the top of the browser and press the tab key. This will initiate the search engine. Then enter the GC code for the cache page you want to view and press enter. For example type in GCK25B to view Geocaching Headquarters.

Initiate a search in the address bar of Chrome


That's all there is to it. I hope you find this as useful as I do.

Monday, September 9, 2013

Geocaching Stats for August 2013

August 2013 was the busiest month of geocaching for me so far. This was partly due to Groundspeak's 31 Days of Geocaching challenge which incentivized people to find a cache every day in August by rewarding them with daily souvenirs. I wasn't chasing souvenirs but it gave me community support to start streaking and I'm now to day 40.

So much happened in August that I wanted to jot down these caching events:
  • Most finds in a day: 50. On 3 August, Mh171 and I went out to chase the Texas 50 State Star geoart puzzle series finding 47 of 51 (four had been muggled).
  • Most finds in a month: 148
  • Cached in two new states, Washington and Oregon, allowing me to complete the 10 States and Provinces Challenge.
  • Filled five Jasmer spots, clearing out 2002 and 2006, finding the 2nd oldest active cache GC12 5/12/2000 in Oregon and finding Iron Horse (2000-10) in Washington.
  • Finished up the AlphaNumeric Cacher Name Challenge (need to sign the log!) by finding caches placed by 50 State Star, 6 Pack Rats and 86suzuki.
  • Logged 13 Geocaching Labs caches (which have messed up my stats because they counted towards total finds but nothing else) including the Microbrew Tour before the Block Party and special event caches during it.
Microbrew Tour Lab Caches in Seattle - 15 August 
  • Reached my 800 milestone by attending the 2013 Geocaching Block Party for the first time in Seattle, WA on International Geocaching Day, 17 August.
2013 Groundspeak Block Party - 17 August
  • Brought my souvenir total up to 52.
New souvenirs for August 2013
  • Rounded out the month by caching in 11 new Texas counties (81/254)
Day 31 of 31 Days of Geocaching
  • Found four more TXGCC13 caches, bringing my total up to 52/80 for the challenge by visiting Mission Tejas and Martin Dies Jr. state parks.
  • Last but not least, I was picked for the Texas Geocaching Association's August 2013 Member Spotlight, thanks to being nominated by the Caching Dead, TXGA's education directors.
My stats are updated monthly around the 7th and can be viewed on my website at strontium87.com.

Wednesday, July 24, 2013

Response to "What I saw in Austin"

The anti-choice website, Live Action News, published an opinion piece on July 16, 2013 by Deanna Chandler titled "What I saw in Austin." She presents a very slanted and fear-inspired perspective of her experience on July 8th at the Texas State Capitol as a "pro-life" young person attending the events there in support of HB2, the sweeping anti-choice legislation passed by the Texas State Legislature on July 12th and signed into law July 18th.

I don't usually respond to articles on the web because I tend to see little value in this user-generated content. Anyone who frequents comment sections is well aware of the knee-jerk posts and lack of critical thinking to be found. But in this instance, I felt compelled to respond because Ms. Chandler's article presented her individual perspective but she tried to frame it as the experience of most "pro-life" people in attendance who were in fear of the bad people in orange.

I see a real danger when one in a crowd starts to speak for that crowd based on his or her beliefs or perspectives. By way of comparison to the bad experiences she claimed to have, I brought up Pastor Jeffress' comments at the "anti-abortion" rally on July 8th:
"I say this to you tonight by the authority of the word of god: Anyone who opposes this bill, whether he or she realizes it, is a tool of satan being used by satan..."
The scary thing about that statement is that Jeffress does speak for the "pro-life" faction; he is a recognized community leader among these folks and he is intolerant and hateful in his rhetoric. To substantiate this claim, he mentions the stupid actions of a few pro-choice people who mockingly chanted "hail satan" to a group of anti-choice protesters. But they doesn't speak for all of us; I couldn't tell you any of their names. That behavior is hardly on the same level as Pastor Jeffress' fear-mongering comments to a public rally with a microphone who claims to speak for god.

My comment in response to Ms. Chandler's article is below:

I don't doubt the perspective of your experience, but it was only YOUR experience. You can't really speak for all "pro-life" people who were there and you make no mention of speaking to or with "pro-aborts" (as you call them). Because if you had, you would know the people wearing orange shirts are not pro-abortion; we are pro-education, pro-women's health and pro-preventing-the-need-for-abortions: all things that for some reason are ignored and defunded by many of the GOP members of the Texas Legislature. How do I know this? Because I'm a Texas woman living through it.

I didn't witness one violent incident, one attack, one threat going in either direction. Everything I witnessed on multiple days at the Capitol were peaceful demonstrations of two very differing beliefs. One side is fighting for women's civil rights while the other is mainly fighting against abortion. I'm sorry you felt scared, threatened or fearful, but I think that's worth looking at; what made you feel that way? You were told by others you might get hurt? People warned you about the bad people in orange? That's called fear-mongering. What bad, terrible things actually happened to you because I don't see that in your article.

I'll tell you what I saw: not one "blue" person offered food or water to anyone other than other blue people. I watched this over and over during the seven hours I waited in line for the senate gallery. Towards the end, I started talking with several of the women in blue standing in front and behind me and while we disagree on this issue, everyone was nice and friendly and I hope realizes that being a citizen in Texas and the US extends beyond this hot-button issue (which by the way is being used by Republicans to get re-elected—not to improve women's health as claimed).

The other thing I witnessed was fierce hate-monger at the "pro-life" rally on the previous Monday where Pastor Jeffress of Dallas referred to those there in legal opposition to his beliefs as "tools of satan." That doesn't sound very nice! My point is, if you look hard enough and believe hard enough, you'll see what you want to see. I could use the logic you did to assume all "pro-lifers" are crazy people from Dallas and that I should watch my back if I go there wearing orange. But what I saw on both sides were passionate folks who wanted to be heard, and the lies you were told.

Friday, July 19, 2013

Ender's Game

I can't stress this enough: Please read Ender's Game instead of watching the movie. This book is fantastic and there is no way the theatrical interpretation can do it justice. Go to the library; buy it online; just read it!

Thank you.

book cover of Ender's Game

Thursday, July 18, 2013

How To Make a "Come and Take It" Flag

In response to the protests over SB5, SB1 and HB2—and with inspiration from the amazing uterus design conceived by Carrie Collier-Brown and created by Cole Latimer—I decided I wanted to make a reusable and durable flag instead of a paper protest sign to carry in marches and to wave at rallies. It took me a few hours to get to the final product in part because I was sitting in line on the hard granite floor of the Texas State Capitol, waiting to get into the Senate Gallery.

Project Description

This is a two-sided flag design with the emblem sewn on and the letters ironed on. I made this all by hand without a sewing machine. It is intended to be used with a pole as a flag but you can certainly make adjustments as you see fit, especially those of you with more skills than me! Please leave suggestions in the comments.

Estimated time: 5 hours
Total cost: $15

black flag with a white emblem of a uterus and star with the words "Come and Take It"
Flag on the floor of the Texas State Capitol


Supplied Needed For this Project

  • Black cloth for the flag, 1/2 yard of 54" fabric
    (This is enough for two flags at 27" wide and 18" tall. I used 100% polyester as most flags are made of nylon.)
  • White cloth for the emblem that when  folded in half is at least 8.5" by 11"
    (Again, I used polyester—a faux suede—and used the "wrong" side of the fabric for the look I wanted.)
  • Iron-on 3/4" letters in white
    (I used Dritz soft flock – CO075HWT.)
  • Black thread
  • Invisible thread
    (I used Wrights 882131 Clear Invisible Thread, 500-Yard.)
  • Fray stop glue
    (I used Dritz 674 Fray Check Liquid Seam Sealant.)
  • Scissors
  • Tape measure
  • Needle
  • Pins
  • Paper and printer for the pattern
  • Masking tape
  • Iron
  • Pole
    (I used an old broom handle I rescued from the dumpster.)


Instructions

These are the steps I took to complete this project. Please modify to fit your own project. :)


Step 1

I started by creating my pattern based on the awesome uterus image I saw on Twitter. Download the "Come and Take It" pattern and print it on a regular sheet of 8.5" x 11" paper. After printing, cut it out carefully along the outside of the lines, not directly on them. You do not need to cut out the letters individually; we will use them as a block to line up the iron-on letters.

uterus with a star above it and the text "Come and Take It'
"Come and Take It" pattern


Step 2

Fold the white fabric in half and pin the uterus and star to it, making sure you pin it to both layers of fabric. Alternatively, you can do this twice and cut out two sets but I cut out both at once being careful to keep the fabric and pattern aligned. Don't skimp on the pins! Pin it down securely.

white fabric with a pattern of a star and a uterus pinned to it
Pin the pattern securely


Step 3

Lay out the black fabric. If you bought 1/2 yard (18") of 54" fabric, all you need to do is cut it in half. If you have a different size fabric, use a measuring tape to mark off a rectangle 27" x 18". I'll be honest; I wasn't real worried about cutting perfectly straight lines. If you plan to hem your project, allow extra fabric for that.

black fabric with a measuring tape and scissors
Cut the base of the flag


Step 4

It's time to apply the fray stop glue. The one I bought had a nice, two sided applicator that allowed me to slip the fabric into the nozzle and squeeze to apply the glue around the edge of all my pieces: star, uterus and flag base. The glue can be a bit messy so I used cardboard scraps under the edges to keep it off my table. Smooth down any loose, frayed fabric while it's still damp then let the glue dry for a few minutes.

person applying glue to fabric edge
Apply glue to all fabric edges


Step 5

Next, let's create the pocket for the flag pole. If you don't plan to use a flag pole, move on to the next step. First, fold over and pin one of the short sides of the flag about 1/4" being sure to pin from underneath; this will be important shortly. Next, lay your flag pole on your fabric and fold over the edge you just pinned to get an idea of how large you need to make the pocket. The pole I used was about 1.5" in circumference. With the pole in place and the fabric folded over it, remove the top pin and re-pin in place, going through all three layers of fabric. Then do this for the bottom pin. Continue this until you have re-pinned everything through the three layers of fabric. Once this is done, carefully remove the flag pole.

black fabric pinned along one edge
Pin the pocket and sew shut

Using a simple looping stitch and black thread, sew the the pocket in place, including along the top of the flag to keep the pole in place. The flag base is now complete.

Step 6

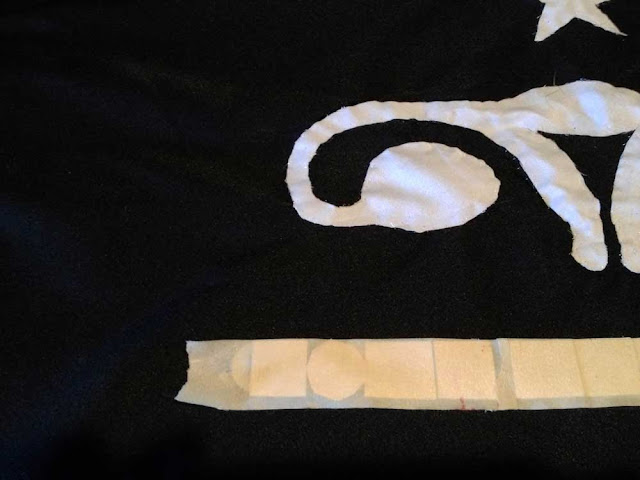
On one side of the flag, lay out one star, one uterus and the block of letters from the pattern. Measure to get it centered horizontally and vertically. Once it is in place, carefully pin the star and uterus to the flag base; this can take a little adjusting, particularly with the uterus, to get it lined up correctly. Using the invisible thread and a simple looping stitch, sew the star and the uterus to the flag base. Be as careful or quick as you like. I wanted my flag to have a hap-hazard look to it.

a white star and uterus emblem sewn to a black flag base
Sew the star and uterus to the flag base

Once the first side of the flag is sewn, flip it over and you can use the stitching to line up the second star and uterus in place. Pin them down and sew to the flag base with the invisible thread.

Step 7

Start cutting out the letters in "Come and Take It". Chances are, you will not have enough letters from one pack. I ended up having to fashion an extra "E", "T" and "A" out of other letters that looked similar. Cut close to the edge of the letters leaving 1/8" of paper. Next, rip off a short piece of masking tape and begin to apply the letters in "Come" to it, paper side down, so that the letters are facing you. The letters need to be backwards, so you must apply the letters to the tape in reverse order and orientation. You can hold the tape up to the light to check if the letters look correct. Do this for each of the four words, keeping the letters close together. You can use the words from the pattern to help. Tape the four words together leaving about 1/4" between them.

iron-on letters cut out and attached to masking tape
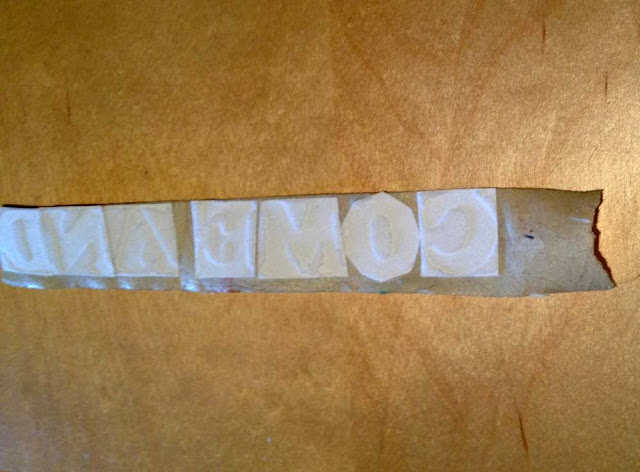
Make sure to line up the letters in reverse on the tape

Step 8

Do each side of the flag separately. Take one set of letters and tape them in place, centered, under the uterus. Make sure they are straight before ironing. Set your iron to whatever setting your letter pack indicates. Pressing for no more than 15 seconds at a time, use your iron to affix the letters to the flag. I had to iron my letters several times, checking in between to see if they were sticking.

iron-on letters taped in place on a black flag
Tape all the words together in place under the uterus and iron on

Once you've ironed on the first set of letters, let it cool then remove the tape and paper. Check to make sure each letter is affixed securely; if not, re-iron those letters. Next, do the same thing to the other side of the flag.

Step 9

Tada! You now have a bad ass flag. Insert the flag pole or just hold your flag and go protest to your heart's content.

two women holding protest signs reading "Come and Take It"
Protesting HB2 at the Texas State Capitol

Wednesday, July 17, 2013

Knocking the Dust off the Ol' Blog

As you can see from the archive list, I've been keeping this blog on and mostly off for seven years. In the beginning, I wanted to make it like an online journal, back in the days before Facebook and Twitter (social media really) were part of our vocabulary and daily life. I wanted a way to share things I thought were important with the world. What I think has evolved in my thinking since that first blog post is the idea of what I really want to put out there. I want to give back to the Internet, not just post about myself.

I have told several people they should blog about the inventions they've made, the crafts they've done and the things they have fixed. I would like to do the same. I've always thought of myself as resourceful and I would like to share what I can with others to encourage re-use of materials, dumpster diving, fixing things for  yourself instead of throwing them away and creating your arts and crafts. For example, this past week I created a flag for a protest rally and received many compliments. It's nothing fancy and could be improved upon, but for someone who never even thought to try, it could be a good starting point. As a re-entry into the "blogosphere" (ugh), I will make my first, true, step-by-step "how-to" and perhaps will take the opportunity to document the feats of others if they are not so inclined.

Tuesday, February 5, 2013

Controlling What I Eat

I have the typical dual problem of many living in the Western world: I don't eat right and I don't get enough exercise. I do try to eat right and I think I eat better than many people, but my weaknesses are sweets and late day/evening snacking. Cookies? Yes, please. Cake? Hellz yeah. A Twix you say? Pile it on.

I am mostly a vegetarian, try to eat vegan and really avoid most animal products. I'm not sedentary either, and even recently started going back to Tae Kwon Do classes in hopes of obtaining my black belt this year, finally! (I took a four year break from TKD to go to grad school.) That said, I more or less maintain my body weight, but it's about 30 pounds too much.

I think I had an epiphany today, trying to figure out yet another food and exercise schedule. It seems that inevitably, I'm struck with hunger pangs which then leads to the urge to snack. Food really does make me feel better. As someone pointed out in a documentary I watched this past weekend called Forks Over Knives, we are in a sense addicted to crappy food.

But what if I could control my reaction to hunger pangs in the same way I control my urge to punch someone in the face who has made me angry? We learn our responses to physical and emotional stimuli so in many cases, we should be able to reprogram them. Hunger is a little bit different since it is an innate response but I think the degree and frequency of the feeling is probably a learned response.

In other words, when I've felt hungry, I've never sat there and just noticed the feeling of hunger. I've never quietly paid attention to the thoughts that follow it and then chosen to ignore those voices. I'm going to try this and see just how effective it might be.

Sunday, January 6, 2013

WorkInTexas.com

Part of the requirements to receive unemployment benefits in Texas is creating an account with WorkInTexas.com, which bills itself as the "largest free job matching network in Texas." I had created an account back in December when I heard I might be getting laid off.

Once you create an account, you have to fill out all this job search-related so that you can be matched with jobs. You can also complete a State of Texas Application, which I think might make you visible to employers looking for candidates, but I'm not sure. At the moment I have 0 job matches, which seems odd.


I'll be checking with the site every few days. I wonder if they track that?